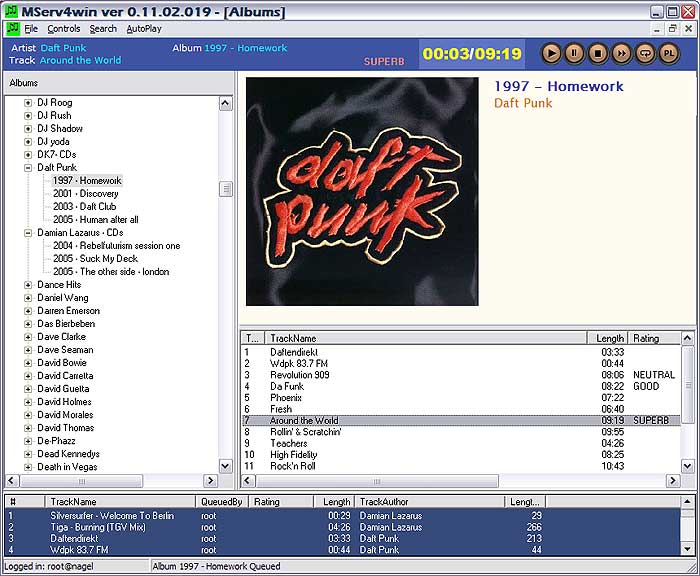
You can rate numbers as superb, good, normal, bad, awful etc. and it takes this into account to play numbers more or less often, depending on your rating. Everybody can rate, so this is a good jukebox to use with a group of people.
There are a few clients available, and I've taken MservClient as a base to further develop the windows client. MservClient is written by Marco Schulze and Marc Klinger, and can be found here. Because I've changed the whole concept of MservClient, I adopted a new name: Mserv4win. Also, there is not much left from the original code of mservclient. Mserv4win takes the look and feel from winamp and puts it on top of mserv.
One of the things missing in Mserv is a good "cover picture" feature, so I've also added an "x cover" command to get a cover pic from the server. The client still talks to the original server that does not support this command, but with this feature, the experience is a lot better.
Here's a screenshot:

Download Mserv4win: MServ4win.zip
Download source (delphi7): sources.rar
If you want to patch your mserv for "cover" support, use this to patch mserv's cmd.c and recompile: cmd.patch
or replace cmd.c with this version: cmd.c
make sure you put cover .jpg files in the same directory as the album mp3's. Also, make sure the jpg is not too big (max 50k or so)
[ add comment ] ( 75 views ) | permalink | related link |


 ( 2.9 / 1291 )
Even een item in het nederlands. Wat is het toch lastig om informatie te vinden over het printen van acceptgiro's, en dan met name het berekenen van de controle getallen.
Uiteindelijk bij interpay de goede informatie gevonden:
http://www.interpay.nl/binaries/IPforms ... -34971.pdf
Maar hoe werkt het nou? Vrij simpel. Alle controles worden met de bekende 11-proef (modulus-11 algoritme) uitgevoerd. Dat wil zeggen dat je elk cijfer met een weging optelt en het resultaat deelt door 11. De rest die je overhoudt trek je van 11 af en dit geeft het controle getal.
voorbeeld: (16 cijferig betalingskenmerk)
c000 0567 8901 2345 (c=het controlegetal dat we gaan berekenen)
de wegingen zijn 2 4 8 5 10 9 7 3 6 1 en die moet je vanaf rechts toepassen, en als je klaar bent begin je weer van voor af aan. Dus:
c 0  0  0  0  5  6  7  8  9  0  1  2  3  4  5
  10 5  8  4  2  1  6  3  7  9 10  5  8  4  2
--------------------------------------------- x
  0+ 0+ 0+ 0+10+ 6+42+24+63 +0+10+10+24+16+10 = 215
215/11 = 19 rest 6
11-6 = 5 dus controle getal (c) is 5
dus het betalingskenmerk is dan
5000 0567 8901 2345
Als antwoord op de vraag van wouter:
Indien C = 10 wordt 1 aangenomen
Indien C = 11 wordt 0 aangenomen
[ 1 comment ] ( 265 views ) | permalink | related link |


 ( 2.9 / 883 )
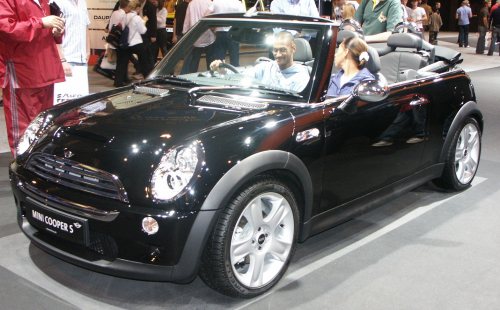
I recently bought a mini cooper, because it's such a great car. (yes, it's the cooper-S convertible, model 2005, so the only thing it needs is the "cooper works" upgrade)

But even nowadays, a simple aux-input on the radio is not a standard option. And who listens to music without an mp3 player/ipod?
I have bought an Archos mp3 player with 20Gb disk a couple of years ago, and although it's large and old, and it has a slow USB 1.0 port, it still functions as my music take-away. But without an input on the car radio, it's useless.
But no worries, a bit of googling suggested a solution.
unfortunately, this did not work for me, as other people in the article suggest, it works only for *some* radio models.
So I started some experiments. First, get the radio out. The plastic cover under the steering wheel is locked by some "clicking" pins, so a hard pull will tear it down. This makes room to unscrew both torx screws on the left and right side of the radio compartment.
My radio turns out to be BMW radio, probably from Alpine.
The back reveals a few connectors:

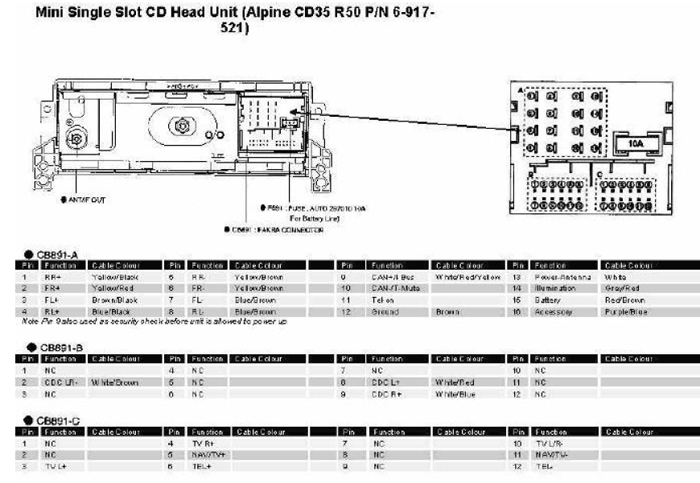
The pin layout is described in this picture, that can be googled for:

So connecting the audio output to pin 3,4 and pin 10 was the first tryout. Cutting an old PC-USB port connecter in pieces was sufficient to get everything connected: (green=pin3 pink=pin4 white=pin10)
But no success. The problem is that the radio does not "recognise" the aux input, and the MODE key doesn't include AUX in its options. So what is the trick?
I noticed that turning the volume up and clicking on the mode key very rapidly sometimes DID give the AUX menu for a second or so. So I guessed it should be some kind of impedance/resistor pull up or pull down. So after some experiments I came up with this little thingy:
Basically, it connects the left and right channel with a resistor. To uncouple the audio lines, a small capacitor is used (220n). This seemed to work at first, but some music passages made the AUX menu go away. So I made the resistor smaller and smaller. I also tried to connect it to pin 9 and/or pin 10 as well:
Finally, the best solution for me was this schematic:
                  C1:220nF
Left audio --------||--+---------+----- pin 3
                       |         |
                      +-+        | +-------+
                      | |        +-|  10k  |---+
                      | | R1:1k2   +-------+   |
                      | |          +-------+   +--car ground
                      +-+        +-|  10k  |---+
                       |         | +-------+
Right audio -------||--+---------+-------- pin 4
                 C2:220nF

Audio Ground -----------||-------------------- pin 10
                        C3:2uF
Note: Because the output impedance of the MP3 player is low (speaker output, typically 1-50 ohms) the 1k2 resistor does not have a large impact on stereo separaion.
[ 1 comment ] ( 41 views ) | permalink | related link |


 ( 3 / 1082 )
The normal case: been busy for my latest project, and after a few days of sweat to produce the finest .exe, I dont care about installation and give the exe to everybody "to try it out". But nowadays, that's hardly acceptable: nobody expect an application to be "just an exe" that you need to put in a /program files directory yourself. So what's availbale?
I've been using InnoSetup. From a very simple version that I've got a few years ago it has grown to a full blown installation program. It support scripting, is multilangual, and there are aven a lot of design tools especially created for InnoSetup. So it is the obvious choice for me. But maybe there are alternatives.
There is microsoft, with their msi "technology" which is -as usual- very complex wihout much more features. I hate steep learning curves, so after a few tries, I decided not to use it. The concept is good: instead of writing procedural code, you just define what you need installed where, and it does the job for you. But getting rid of a procedural language should make the job EASIER, not HARDER. And there are no real benefits. So goodbye msi.
Then I investigated the "usual suspects": Wise and Installshield, the 2 top commecial installers available. Everybody with experience with both told me to skip installshield and go straigt for wise, because it was superiour. Because I had a legal version of wise 9, I tried it. But even this newest version has a windows 3.1 feeling, that you might get rid of with all kinds of patches and images, but in the end you are still stuck without normal Windows XP controls (like the green progressbar) And the wise "language" made me sick. If this is the commercial state of the art, then forget it and go straight to open source, because innosetup is way way superior over wise.
After this experience, I forgot about installshield. If this is not better than wise, it is not worth to investigate further.
And then there is NSIS. This is also open source, and is derived from the winamp installer. It is a comic farting lama counterpart of inno. It looks reasonalby good, at least as good as the wise installer, but also here you get a windows 3.1 feeling which goes away after a lot of "cosmetic" stuff.
Conclusion: Innosetup lives up to its expectations and is still my number one choice.
[ 1 comment ] ( 1392 views ) | permalink | related link |


 ( 3 / 1173 )
I've just finished a new version of the icelandic-horses website. Because it's a fairly large site, I decided to use tabs on top of the page, to make navigation simple and intuitive.
Just looking for what is available on the net, i found lots an lots of nice implementations, however, they all were very complex, used a lot of javascript or everything was done with images/tables. I wanted a PHP/CSS solution without images, and in fact, it turned out very simple, and looks like this:

(no javascript and only 1 image used: a transparant dot (a gif file of 1x1 pixel, transparant)
Here is the class code:
class txtwebmenu {
	var $objs;	// all assigned objects
	var $atxt = array();
	var $aurl =array();
	var $aopt =array();
	var $nrobjs=0;
	var $cursel="";

	// additem - add a menu item,
	//		$item 		= the item ID
	// 		$txt		= default/normal image
	//		$url		= jump-to url on select
	function additem($item,$txt,$url="",$opt="") {
		$this->atxt[$item] = $txt;
		$this->aurl[$item] = $url;
		$this->aopt[$item] = $opt;	// options
	}

	// genmenu - the payoff: generate the whole thing
	//		$sel  = item id of current selected item
	function genmenu($sel="",$msize=2) {
		if (strlen($sel)>0)
			$this->cursel=$sel;

		echo "<table border=0 cellpadding=0 cellspacing=0 width=100% bgcolor=white>";
		echo "<tr><td height=3><img src='/ijs/gifs/transdot.gif' border=0></td></tr>";
		echo "<tr><td>";
		echo "<table border=0 cellpadding=$msize cellspacing=0>";
		$ffirst=true;
		reset($this->atxt);
		while (list ($item, $txt) = each ($this->atxt)) {
			echo ($ffirst) ? "<tr height=14><td class=twbspc><img src='/ijs/gifs/transdot.gif' border=0 width=6></td>" : "";
			$target= (strchr($this->aopt[$item],"T") ? "target='_blank'" : "");
			if ($this->cursel==$item) {
				printf("<td class=twbmnuS align=center nowrap >");
				echo "<a class='twbmnuS' href='".$this->aurl[$item]."' $target >$txt</a>";
			}
			else {
				printf("<td class=twbmnu align=center nowrap>");
				echo "<a class='twbmnu' href='".$this->aurl[$item]."' $target >$txt</a>";
			}
			echo "</td>";
			echo "<td class=twbspc><img src='/ijs/gifs/transdot.gif' border=0 width=".($msize>1?"4":"2")."></td>";
			$ffirst=false;
		}
		echo "<td class=twbspc width=100%><img src='/ijs/gifs/transdot.gif' border=0 width=1></td>";
		echo "</tr>";
		echo "</table>";
		echo "</td></tr>";
		echo "<tr><td bgcolor=#F2F1DD height=3><img src='/ijs/gifs/transdot.gif' border=0></td></tr>";
		echo "</table>";
	}
}
And here is the CSS. Acutally the whole "tab" look is done with borders in CSS:
TD.twbmnuS	{font-family: verdana,arial,helvetica,sans-serif; font-size: 11px; font-weight: normal;
		border-style:solid; border-color: #606060; background-color:#F2F1DD;
		border-top-width: 1px;
		border-left-width: 1px;
		border-right-width: 2px;
		border-bottom-width: 0px;
		padding-left: 2px; padding-right:2px;}
TD.twbmnu	{font-family: verdana,arial,helvetica,sans-serif; font-size: 11px; font-weight: normal;
		border-style:solid;  border-color: #606060; background-color:#DDDDDD;
		border-top-width: 1px;
		border-left-width: 1px;
		border-right-width: 2px;
		border-bottom-width: 2px;
		padding-left: 2px; padding-right:2px; }
TD.twbspc	{border-style:solid;  border-color: #606060;
			border-top-width: 0px;	border-left-width: 0px;	border-right-width: 0px; border-bottom-width: 2px; }
A.twbmnu:link		{text-decoration: none; color: #164B56; xx: #567181;}
A.twbmnu:visited 	{text-decoration: none; color: #164B56; xx: #567181;}
A.twbmnu:Hover 		{text-decoration: underline; color: #000000; }
A.twbmnuS:link		{text-decoration: none; color: #000000; }
A.twbmnuS:visited 	{text-decoration: none; color: #000000; }
A.twbmnuS:Hover 	{text-decoration: underline; color: #000000; }
And here is a sample how to use this class:
<?
$mo = new txtwebmenu;		// a new tabmenu
$mo->additem('nr1','Item1',"item1.php?curmenu=nr1");
$mo->additem('nr2',"Item2","item2.php?curmenu=nr2");
?>
..html..
    <?		$mo->genmenu($curmenu);		?>
...html..
You could use separate php files for each tab-page, or use one "big" php file with all pages. With additem, you just supply the url of the page itself.
If you use separate php files, be sure to include the code above in every file (with an include)
The $curmenu var indicates which tab to highlight. Be sure to set it right, otherwise all tabls are grey
[ 25 comments ] ( 807 views ) | permalink | related link |


 ( 3 / 1054 )
Back Next

 Calendar


